What is Odoo?
Odoo is a modular, open-source business platform that unifies multiple business applications:
- CRM
- Sales
- Accounting
- Human Resources
- Inventory
- Billing
- and many more...
Its modern web interface and module ecosystem make it an ideal solution for small, medium, and large businesses. To learn more, read our article about Odoo.
What will you learn in this tutorial?
This guide will show you how to implement Odoo 18 on an Ubuntu 22.04 server, integrating PostgreSQL, configuring Nginx as a reverse proxy, and applying best practices for security and performance.
This guide will teach you to:
- Prepare an Ubuntu 22.04 server for production
- Install and configure PostgreSQL as a database for Odoo
- Set up the Odoo Nightly repository
- Create and configure the odoo.conf file correctly
- Use systemd to start Odoo as a system service
- Configure Nginx as a reverse proxy with HTTPS (optional)
- Activate features like live chat and long polling
- Apply key performance and security adjustments
Prerequisites for installing Odoo 18 on Ubuntu
Before starting the installation of Odoo 18 on Ubuntu 22.04, make sure to meet the following requirements:
- An instance of Ubuntu 22.04 LTS (it can be on your PC, on a VPS, or in the cloud like AWS, Azure, or GCP)
- In this tutorial, we use a VPS in the AWS cloud with a 2-core CPU, 512MB of RAM, and 20GB of disk space. If you have more resources, that's better.
- Access as root user or sudo permissions
- A stable internet connection
- Configured domain (optional, but recommended for using Nginx and SSL)
- If you are going to use a domain name, make sure that your Ubuntu instance has ports 80 and 442 open.
- If you are not going to use a domain name, make sure that your Ubuntu instance has port 8069 open.
Step 1: System update and initial setup.
En este paso vamos a conectarnos al servidor a través de SSH, actualizarel sistema, configurar nuestra zona horaria, y agregar un espacio de memoria swap de 512M para mejorar el rendimiento del sistema.
Replace user with your access username, and IP-address with the public IP address of your server to connect.
# Conéctate a la máquina vía SSH
ssh usuario@dirección-IP

# Cambia a super usuario y actualiza el sistema
sudo su
apt update
apt -y upgrade

# Asigna una zona horaria
timedatectl set-timezone America/Bogota;

# Configura la memoria swap
dd if=/dev/zero of=/swapfile bs=1M count=512;
chmod 600 /swapfile;
mkswap /swapfile;
swapon /swapfile;
swapon -s;
echo "/swapfile none swap sw 0 0" >> /etc/fstab ;
Step 2: Installation of the database engine.
In this step, you will need to configure the PostgreSQL repository and install the database engine.
# Importa el repositorio con las llaves PostgreSQL
apt install curl ca-certificates
install -d /usr/share/postgresql-common/pgdg
curl -o /usr/share/postgresql-common/pgdg/apt.postgresql.org.asc --fail https://www.postgresql.org/media/keys/ACCC4CF8.asc

# Crea el archivo de configuración del repositorio de PostgreSQL
. /etc/os-release
sh -c "echo 'deb [signed-by=/usr/share/postgresql-common/pgdg/apt.postgresql.org.asc] https://apt.postgresql.org/pub/repos/apt $VERSION_CODENAME-pgdg main' > /etc/apt/sources.list.d/pgdg.list"

# Instala la base de datos PostgreSQL
apt update
apt install postgresql-17
Step 3: Installation of Odoo.
In this step, we will configure the Odoo v18 repository, install Odoo, and the other required packages on the server.
# Crea el archivo de configuración del repositorio de Odoo v18
wget -q -O - https://nightly.odoo.com/odoo.key | gpg --dearmor -o /usr/share/keyrings/odoo-archive-keyring.gpg
echo 'deb [signed-by=/usr/share/keyrings/odoo-archive-keyring.gpg] https://nightly.odoo.com/18.0/nightly/deb/ ./' | tee /etc/apt/sources.list.d/odoo.list

# Instala el software Oddoo
apt-get update
apt-get -y install odoo wkhtmltopdf
At this point, we have already installed the minimum requirements to run Odoo v18.
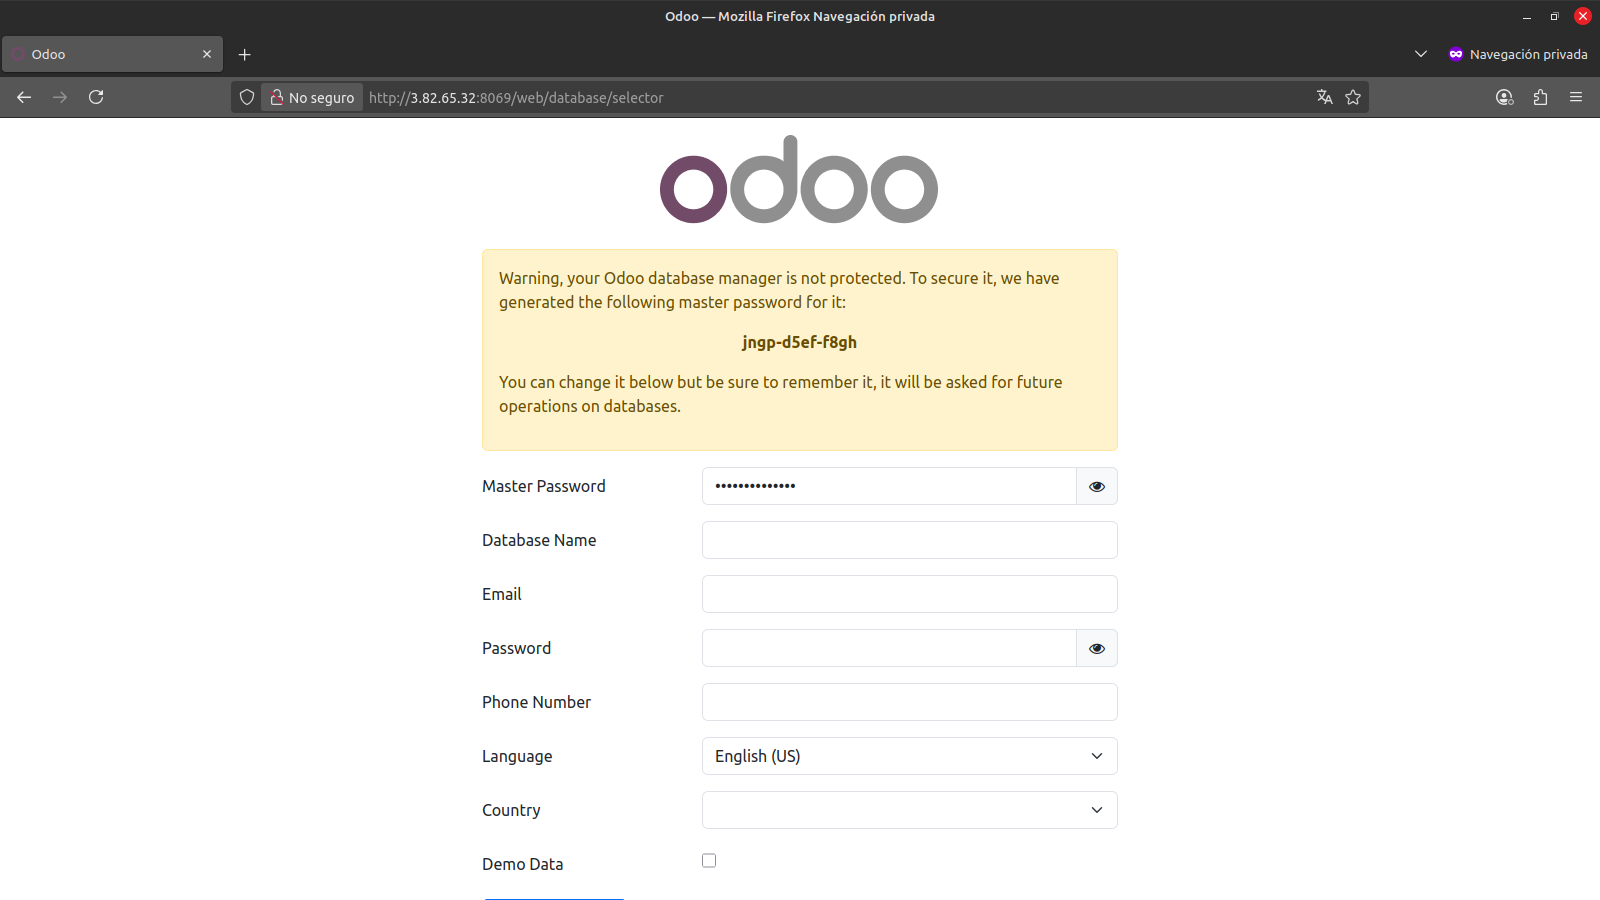
You can validate that everything is working correctly by connecting from a web browser to your server's IP address on port 8069, like this:
Replace IP-address with the public IP address of your server.
http://IP-address:8069
Or if you installed Odoo on your personal computer, you can use your machine's local address like this:
http://127.0.0.1:8069
If everything is correct, you should see the initial setup screen of Odoo.
At this point, you can set up Odoo and start using it for your business without the need for a domain name.

Step 4: Installation of Nginx and the certificate for HTTPS connections.
If you do not have a domain name for your Odoo instance, you can skip directly to step number 6.
In this step, we will install and configure the Nginx web server with the domain name we wish to use, and generate a free security certificate with Let's Encrypt to enable secure connections (HTTPS).
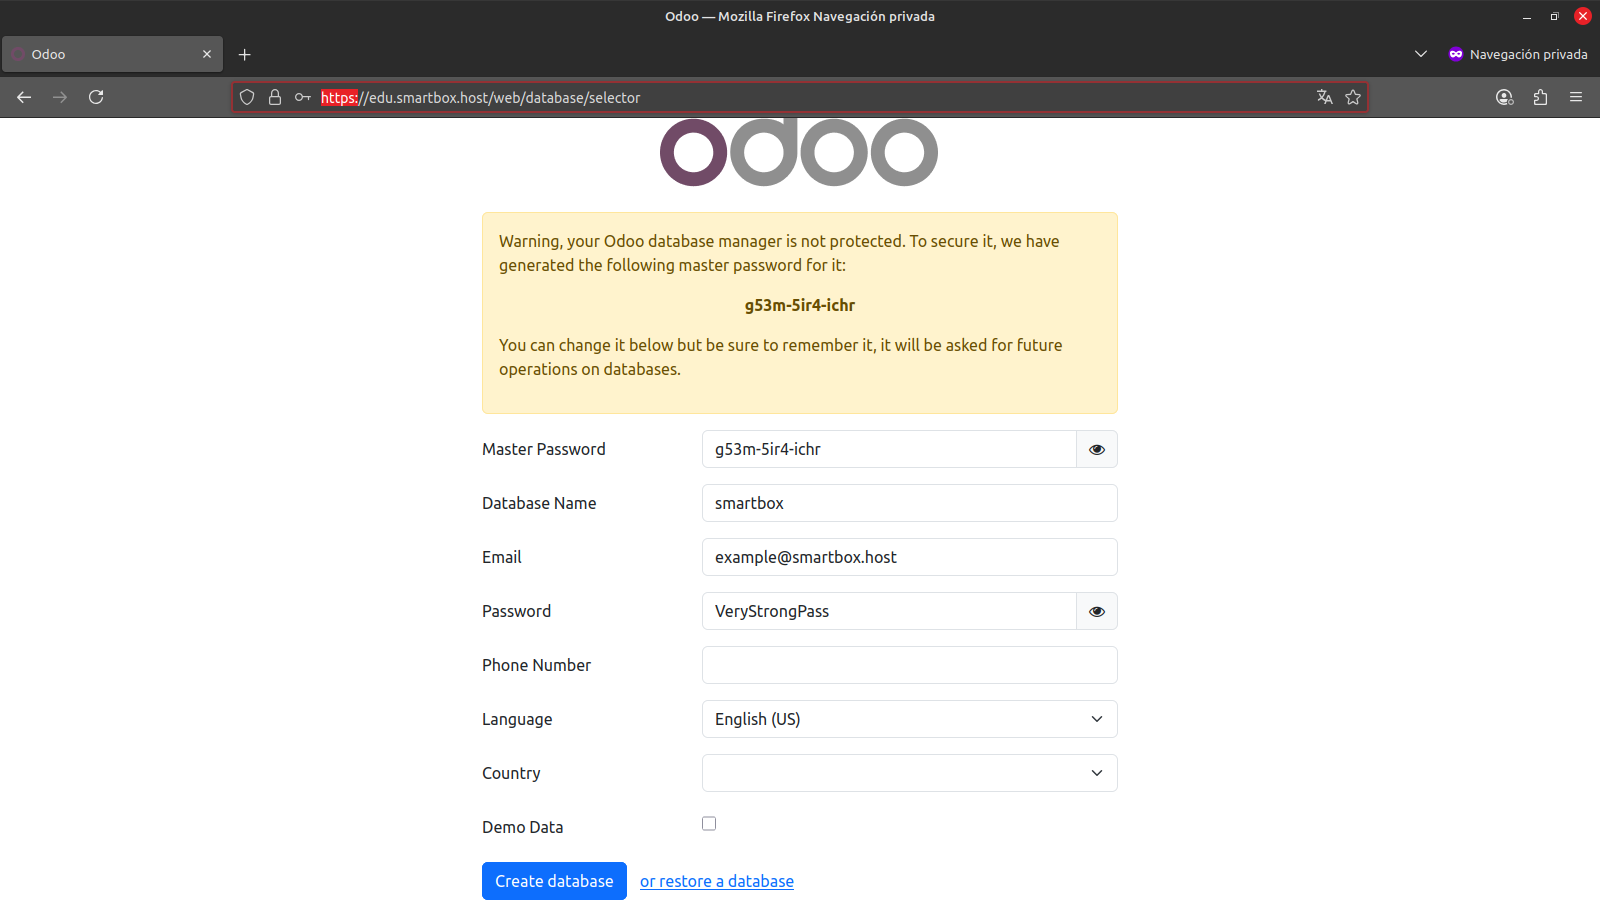
- Replace edu.smartbox.host with the domain name or subdomain you want to use to access your Odoo instance.
- Replace example@smartbox.host with a valid email where you can receive notifications about your security certificate.
- The domain name must be correctly pointed to the IP address of your server in order to generate the security certificate.
# Instalamos el servidor web y el software adicional
apt install nginx python3-certbot-nginx certbot

# Creamos el host virtual con el nombre de dominio elegido
cat > /etc/nginx/sites-available/edu.smartbox.host.http.conf<< 'EOF'
# http
server {
listen 80;
server_name edu.smartbox.host;
}
EOF

# Activamos el host virtual en el servidor web
ln -s /etc/nginx/sites-available/edu.smartbox.host.http.conf /etc/nginx/sites-enabled/edu.smartbox.host.http

# Solicitamos el certificado de seguridad a la entidad certificadora
certbot -m example@smartbox.host --agree-tos --test-cert --no-eff-email --redirect --apache -d edu.smartbox.host
Step 5: Configure Nginx as a reverse proxy for access to Odoo.
In this step, we will create the necessary configuration to access our Odoo instance using our domain name and enable services like live chat.
Replace edu.smartbox.host with the domain name or subdomain you want to use to access your Odoo instance.
# Configuramos los upstreams
cat <<'EOF' > /etc/nginx/conf.d/upstreams.conf
#odoo server
upstream odoo {
server 127.0.0.1:8069;
}
upstream odoochat {
server 127.0.0.1:8072;
}
map $http_upgrade $connection_upgrade {
default upgrade;
'' close;
}
EOF
cat /etc/nginx/conf.d/upstreams.conf

# Aplicamos la configuración del proxy inverso
cat > /etc/nginx/sites-available/edu.smartbox.host.http.conf< 'EOF'
# http -> https
server {
    if ($host = edu.smartbox.host) {
        return 301 https://$host$request_uri;
    } # managed by Certbot

    listen 80;
    server_name edu.smartbox.host;
    return 404; # managed by Certbot
}

server {
    listen 443 ssl; # managed by Certbot
    server_name edu.smartbox.host;

    proxy_read_timeout 720s;
    proxy_connect_timeout 720s;
    proxy_send_timeout 720s;

    # SSL parameters
    ssl_certificate /etc/letsencrypt/live/edu.smartbox.host/fullchain.pem; # managed by Certbot
    ssl_certificate_key /etc/letsencrypt/live/edu.smartbox.host/privkey.pem; # managed by Certbot
    include /etc/letsencrypt/options-ssl-nginx.conf; # managed by Certbot
    ssl_dhparam /etc/letsencrypt/ssl-dhparams.pem; # managed by Certbot

    # log
    access_log /var/log/nginx/smartbox.host.access.log;
    error_log /var/log/nginx/smartbox.host.error.log;

    # Redirect websocket requests to odoo gevent port
    location /websocket {
        proxy_pass http://odoochat;
        proxy_set_header Upgrade $http_upgrade;
        proxy_set_header Connection $connection_upgrade;
        proxy_set_header X-Forwarded-Host $host;
        proxy_set_header X-Forwarded-For $proxy_add_x_forwarded_for;
        proxy_set_header X-Forwarded-Proto $scheme;
        proxy_set_header X-Real-IP $remote_addr;
    }

    # Redirect requests to odoo backend server
    location / {
    # Add Headers for odoo proxy mode
        proxy_set_header X-Forwarded-Host $host;
        proxy_set_header X-Forwarded-For $proxy_add_x_forwarded_for;
        proxy_set_header X-Forwarded-Proto $scheme;
        proxy_set_header X-Real-IP $remote_addr;
        proxy_redirect off;
        proxy_pass http://odoo;

        # Enable HSTS
        add_header Strict-Transport-Security "max-age=31536000; includeSubDomains";
        # requires nginx 1.19.8
        #proxy_cookie_flags session_id samesite=lax secure;
    }

    # common gzip
    gzip_types text/css text/scss text/plain text/xml application/xml application/json application/javascript;
    gzip on;
}
EOF
Step 6: Setting up the database for your Odoo site.
If you jumped to this step from point number 4, replace edu.smartbox.host with the IP address of your server on port 8069, like this.
IP-address:8069
If you installed Odoo on your personal computer, replace edu.smartbox.host with your machine's local address, like this:
127.0.0.1:8069
Access your domain name (or the IP address of your server if you do not have a configured domain name) from a web browser.
http://edu.smartbox.host
If everything is correct, you should see the initial setup screen of Odoo and also notice that the web address changes from http to https, indicating that it is now a secure connection.
Enter the required data and click the "Create database" button. Remember to securely save your "Master password" and the "Password".
The "Master password" allows us to create backups of the Odoo instance. On the other hand, the "Password" is the password we will use to log in with administrator privileges in Odoo, to install the modules we need and create the users for our company.

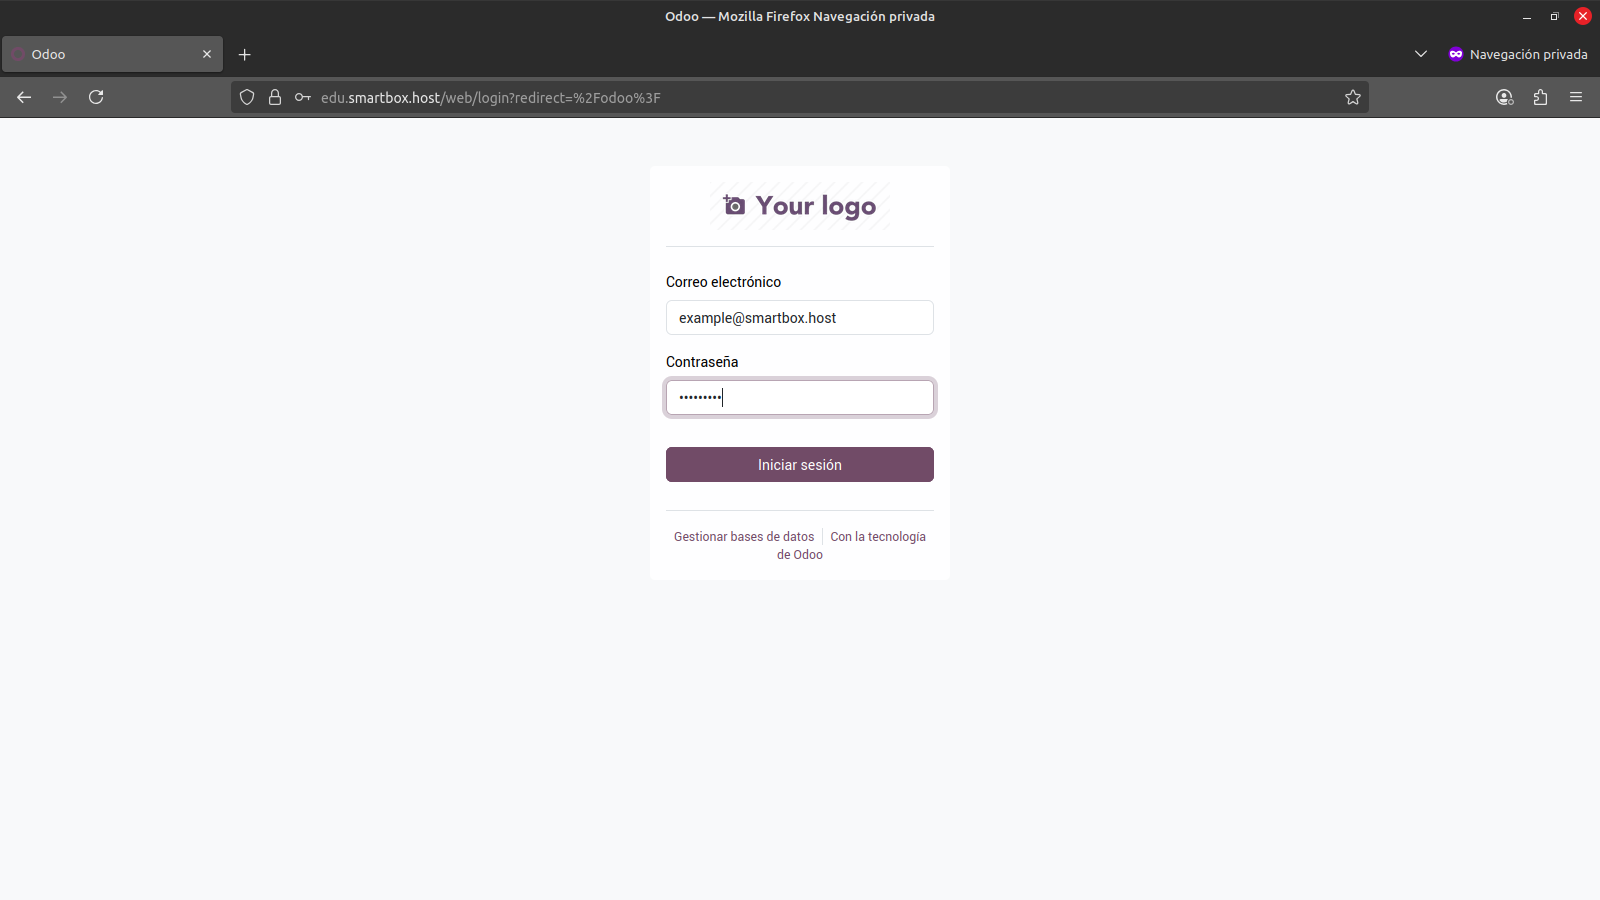
After clicking on "Create database," the system will create the database and the necessary configurations to make our Odoo instance fully functional and ready to use.
If everything goes well, after a few minutes we will be presented with the login screen, where we can log in for the first time to our Odoo instance using the "Email" and "Password" we chose in the previous step, and set up our website, e-commerce, inventory, or any other function we need to manage our business.

Step 7: Final adjustments.
In this step, we will configure the longpolling service, protect our databases from public access, apply some final adjustments, and restart the Odoo service to apply the changes made.
If you are not using Nginx as a reverse proxy (steps 4 and 5), change the value of proxy_mode from True to False, like this:
proxy_mode = False
# Aplicamos los ajustes finales en el archivo de configuración de Odoo
cat >> /etc/odoo/odoo.conf<< 'EOF'
log_level = info
logfile = /var/log/odoo/odoo-server.log
longpolling_port = 8072
list_db = False
workers = 2
proxy_mode = True
EOF

# Reiniciamos el servicio de Odoo
systemctl restart odoo
At this point, we have our Ubuntu 24.04 LTS server ready with our own instance of Odoo CRM/ERP, ready to be used for managing our business.
Now you can return to the login screen, log in with the email and password chosen in step number 6, and activate the modules or applications you need to use for your business, including: Website, E-commerce, Inventory, Point of Sale, and more.
Do you need help with your Odoo implementation?
At SmartBox Host, we help you install, customize, and adapt Odoo to your business processes. Complete the following form and one of our experts will contact you to offer you a free consultation.
Installing Odoo18 Community Edition on Ubuntu 22.04